
Step-by-step guide to migrate multiple email accounts from Exchange Server to Office 365
Even though Office 365 has been publicized as Microsoft’s fastest growing business ever, people are still confused when it comes to migrating mailboxes from Exchange Server to office 365. Migrating mailbox from Exchange Server to Office 365 can be tranquil and stress free, but with improper planning it can be also difficult and unmanageable.
Mailbox hold everything that’s important, and thus, migrating them from one version to another has become a need for today’s communication standards. By using Exchange Migrator, organizations can easily migrate multiple email accounts from Exchange Server to Office 365. Due its user-friendly interface and data reliability, this software possess the ability to take the pain away associated with troublesome mailbox migration.
Here are the steps to move multiple mailboxes from Exchange Server to Office 365.
Let’s migrate!
Step 1: Pre-Migration Analysis
With pre-migration analysis you can easily plan effective and error-free migration prior to actual migration. To know about the approximate time for migration, you need to stipulate total agents that will be used for load sharing and the network speed.
Create Mailbox Migration Analyzer Job
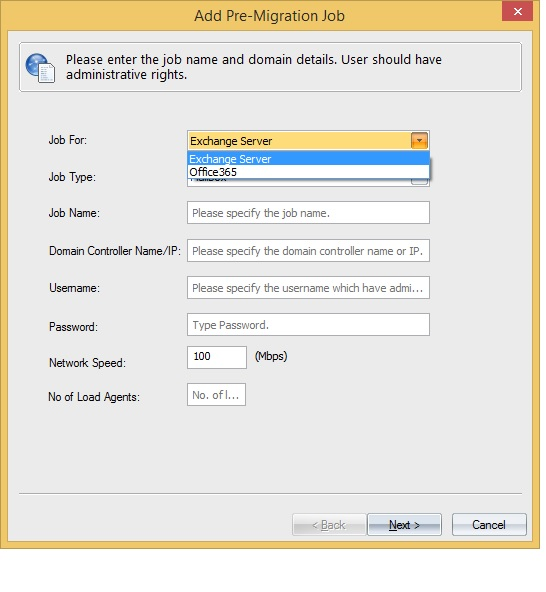
1. The first step in creating analyzer job is to specify job name and other domain details.
Go to Tools -> Pre-Migration. Pre-Migration screen opens up -> Click on Add button.
Add Pre-Migration Job wizard starts.
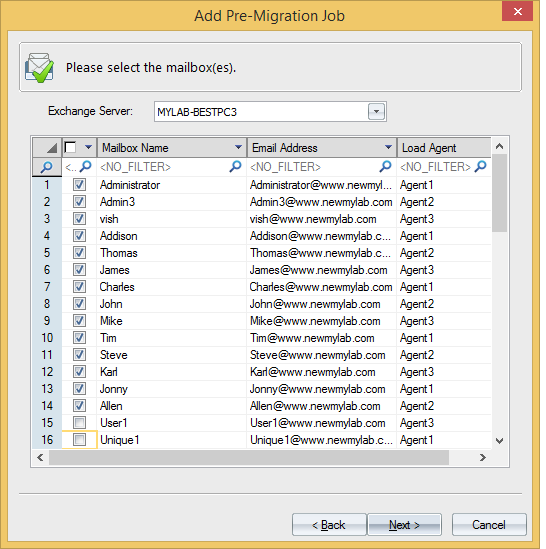
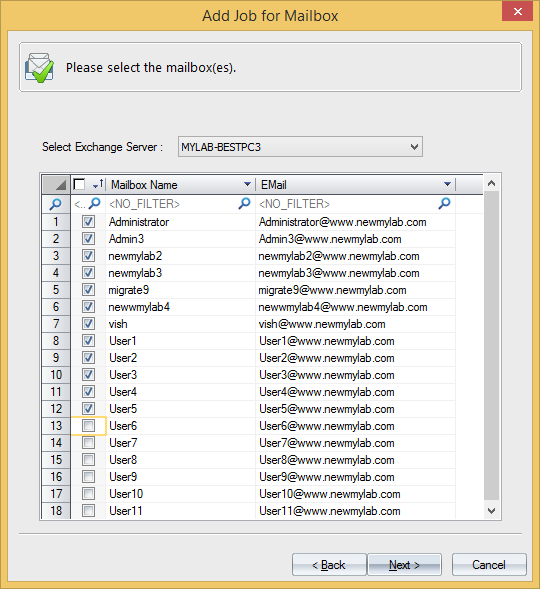
 2. First select the Exchange Server and then the mailboxes that you want to migrate. Then click next.
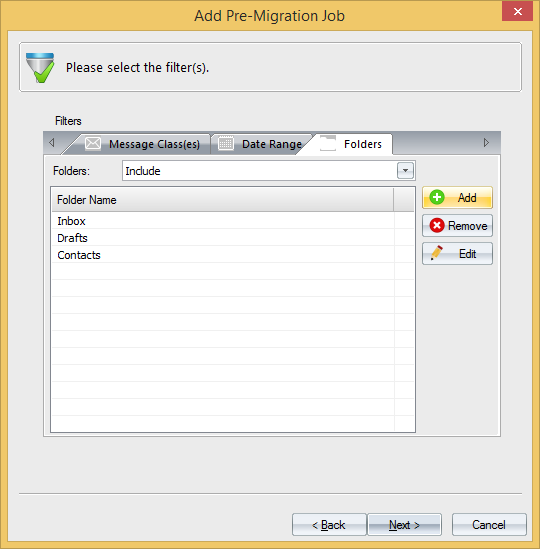
3. You can also filter data on the basis of different criterions such as "Message Classes", "Date Range" and "Folders”. After selecting the filters click on add button and then click next.
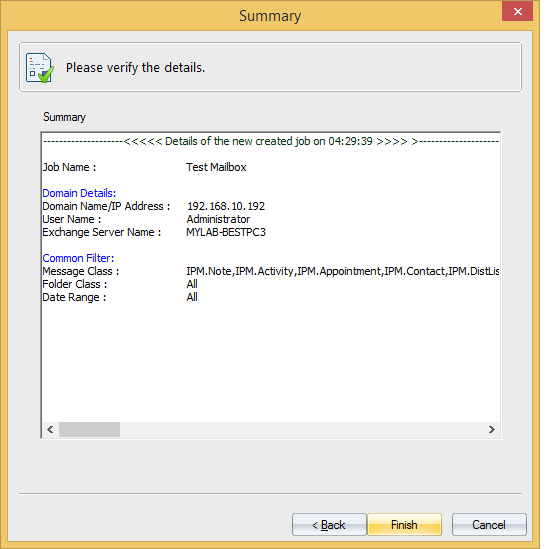
4. Now you can go through the settings done so far from the summary page. If you find any inconsistencies, then you can change it by clicking the back button. Otherwise, click finish button to close the wizard.
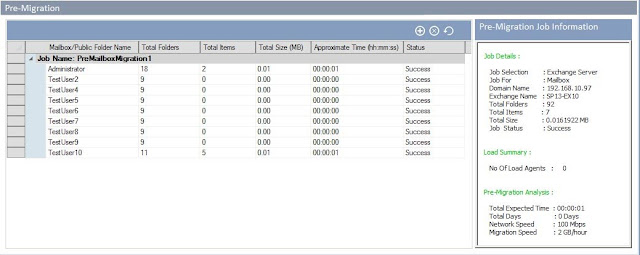
5. On this pre-migration page, you will see total count of items in each mailbox, their size in MB and the approximate estimated time. Moreover, the load summary section on the right pane will also tell you about the availability of agents.
Configuring Agents
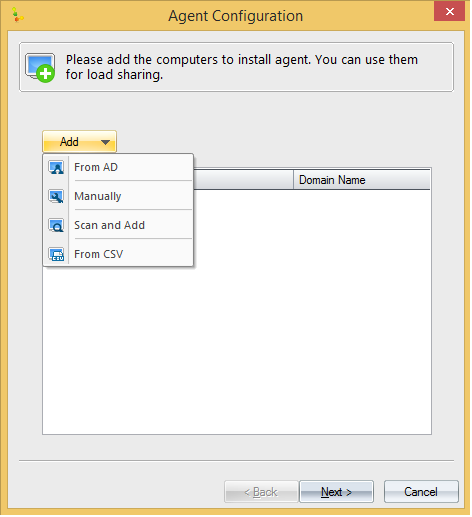
To migrate a large number of mailboxes with huge data, extra system resource is needed so as to accelerate the entire process to finish migration on time. Agent Based configuration feature allows you to use network computers’ resources. To use other computer’s resources, first add those computers to software and install agent on them. Software internally accesses the resources of added computers through agents and accelerates the migration process.
There are four ways to install agents:
From AD: This will add a computer from Active Directory.
Manually: This will add a computer manually.
Mailbox hold everything that’s important, and thus, migrating them from one version to another has become a need for today’s communication standards. By using Exchange Migrator, organizations can easily migrate multiple email accounts from Exchange Server to Office 365. Due its user-friendly interface and data reliability, this software possess the ability to take the pain away associated with troublesome mailbox migration.
Here are the steps to move multiple mailboxes from Exchange Server to Office 365.
Let’s migrate!
Step 1: Pre-Migration Analysis
With pre-migration analysis you can easily plan effective and error-free migration prior to actual migration. To know about the approximate time for migration, you need to stipulate total agents that will be used for load sharing and the network speed.
Create Mailbox Migration Analyzer Job
1. The first step in creating analyzer job is to specify job name and other domain details.
Go to Tools -> Pre-Migration. Pre-Migration screen opens up -> Click on Add button.
Add Pre-Migration Job wizard starts.
3. You can also filter data on the basis of different criterions such as "Message Classes", "Date Range" and "Folders”. After selecting the filters click on add button and then click next.
4. Now you can go through the settings done so far from the summary page. If you find any inconsistencies, then you can change it by clicking the back button. Otherwise, click finish button to close the wizard.
5. On this pre-migration page, you will see total count of items in each mailbox, their size in MB and the approximate estimated time. Moreover, the load summary section on the right pane will also tell you about the availability of agents.
Configuring Agents
To migrate a large number of mailboxes with huge data, extra system resource is needed so as to accelerate the entire process to finish migration on time. Agent Based configuration feature allows you to use network computers’ resources. To use other computer’s resources, first add those computers to software and install agent on them. Software internally accesses the resources of added computers through agents and accelerates the migration process.
There are four ways to install agents:
From AD: This will add a computer from Active Directory.
Scan and Add: This will scan the entire network and select the intended computer manually.
From CSV: This will use a CSV file to add the intended computers.
Step 2: Add Job for Mailboxes
Add jobs to migrate mailboxes from Exchange Server to Office 365.
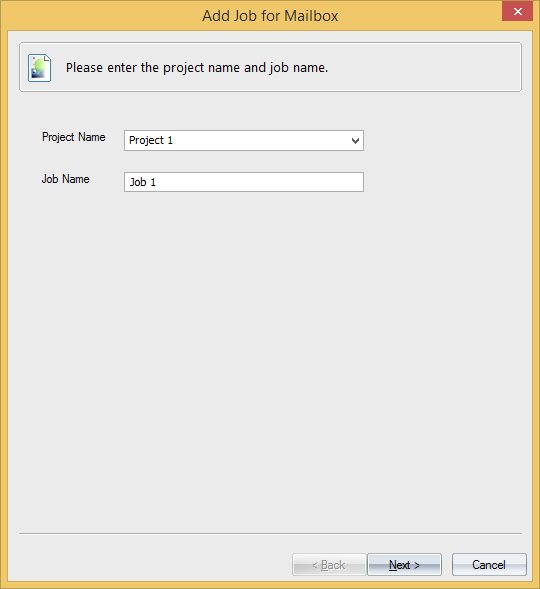
1. Select the project under All Projects tab in the left pane. Then select Add Job for Mailboxes.
2. Select the project from the Project Name drop-down. Enter a name for the new Job. Click on Next.
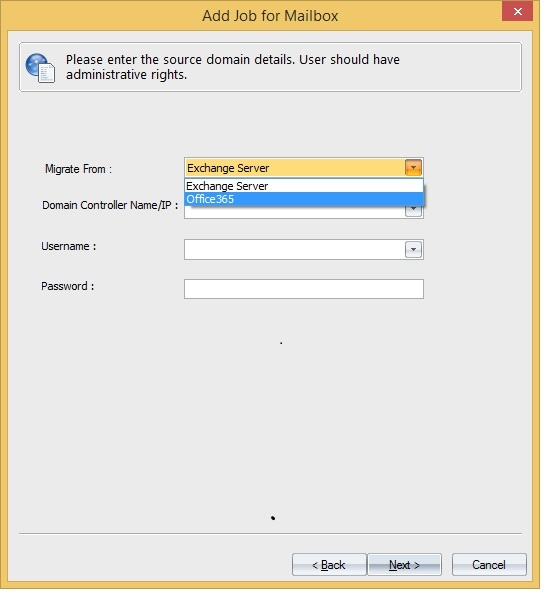
3. Then enter source domain details. And in the Migrate From tab select your source i.e. Exchange Server.
4. Now select the mailboxes that you want to migrate and click next.
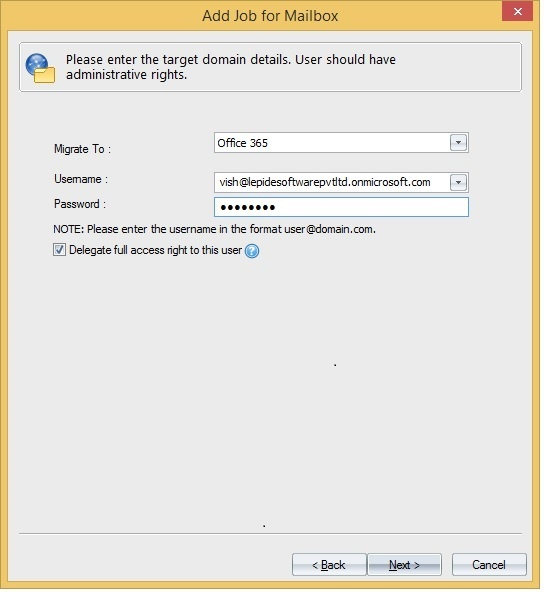
5. Now enter the target domain details where you want to migrate the mailboxes. In this case, select Office 365. For migration, user should have full mailbox access right over mailboxes which should be migrated. If a user does not have obligatory rights and you want Exchange Migration tool to give the rights, select "Delegate full access right to this user" checkbox. Click Next to proceed.
6. Next step is to apply filters so as to migrate messages that are necessary. Three filter options are available namely:
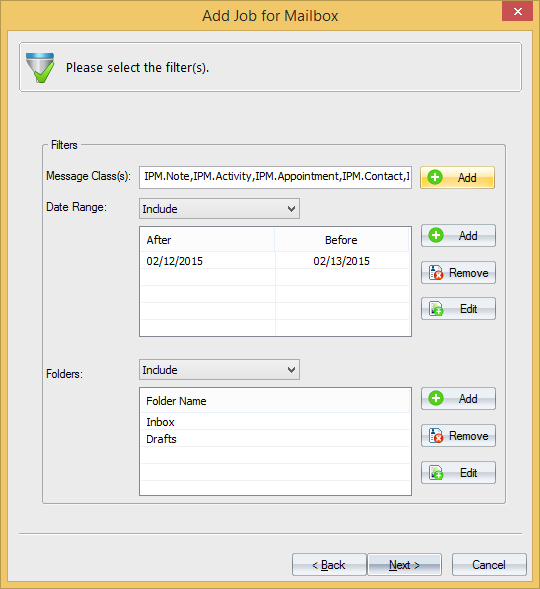
Message Class: By default, all message classes are selected. Deselect message class that you don't want to migrate.
Date Range: It allows you to include or exclude messages within a particular date range.
Folders: It allows you to include or exclude folders from migration.
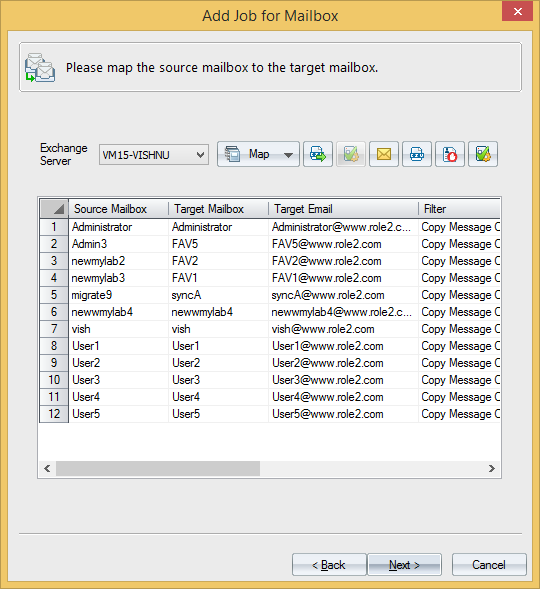
7. The next step is to do mapping of source and target mailboxes. Mapping can be done by two ways:
Map Automatically: It will map mailboxes on the basis of their names. This will map mailboxes only if the names of source and target Exchange Servers are identical.
Map Using CSV: This will map source and target mailboxes using mappings stores in a CSV file.
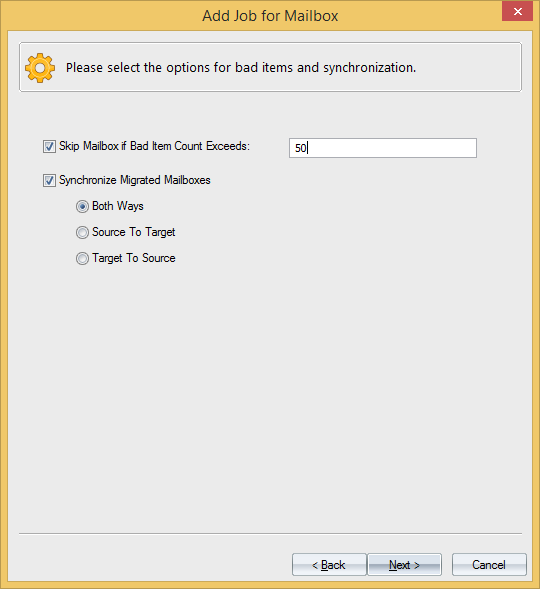
8. Next step is to select the options for bad items and synchronization. You can skip mailboxes if number of bad items count exceeds the given value.
9. To achieve co-existence in mailboxes, you can easily synchronize the source and target mailboxes during and after migration. Synchronization can be done by three ways:
Both Ways: Synchronizes both source and target mailboxes during and after migration.
Source to Target: Keeps only target mailbox in sync with source mailbox.
Target to Source: Keeps only source mailbox in sync with target mailbox.
10. You can also send the notifications for a particular event by specifying the email address of the recipient.
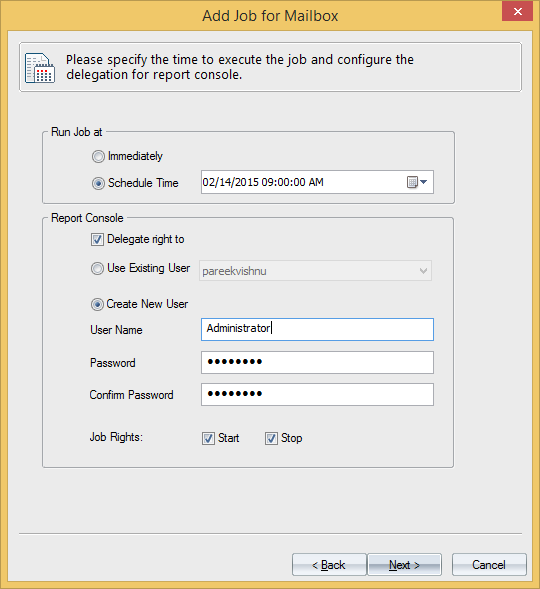
11 . Migrator for Exchange also provides you the functionality to schedule migration jobs as per your convenience. It will run jobs at some later time as specified by you. You can also stipulate login credentials to access Report Viewer.
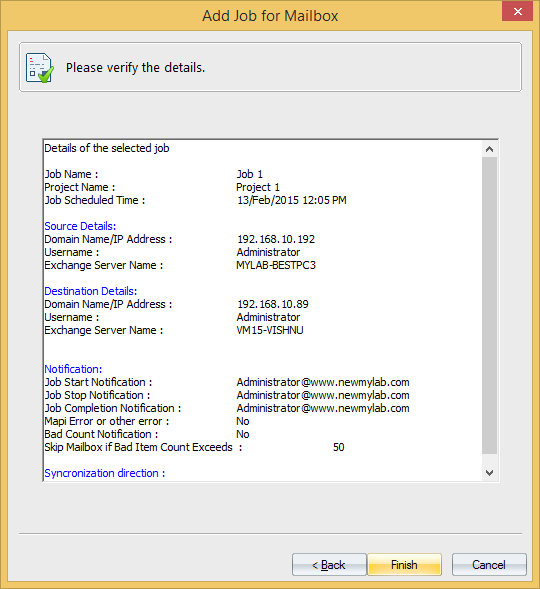
12. It also allows you to review the summary of the whole process. You can use Back button if you want to go back and make any changes. Click on Finish to complete the process.
New Job is created!
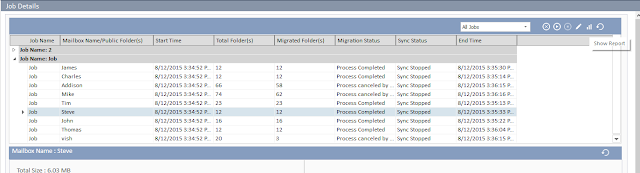
Step 3: View Mailbox Job Reports
Once a migration job has been created and it's running, you can view its status in the Report pane on the All Jobs screen. And then, click on the run button to execute the job.
Migration Done!
These few simple steps are enough to migrate multiple email accounts from any Exchange Server to Office 365 effortlessly. Exchange Migrator provides an easy and simplified way to perform mailbox migration. Besides migrating mailboxes from Exchange Server to Office 365, it also migrates data from one Exchange Server to another Exchange Server. Migrator for Exchange provides organizations an enhanced way to regulate their migration process even in complex migration scenarios.


0 comments: